Android WebView Tutorial With An Example Project + Download Code

Our guides are based on hands-on testing and verified sources. Each article is reviewed for accuracy and updated regularly to ensure current, reliable information.Read our editorial policy.
In this Android WebView tutorial, you will learn how to load a website in the webview, enable zoom options, connect an Android app to your website, and other things. I have also created an example project, and you can download the source code from our GitHub repository.
A WebView is a container that renders a predefined or user-defined web address. Hybrid apps primarily work on the concepts of WebViews, which enable web developers to reuse the website code and target multiple platforms at once.
WebViews runs the web technologies on your device and writes the code in those languages to leverage the native components like cameras, sensors, etc.
In our Android WebView project, we will create a simple web-based app for our blog using WebView control and how to make it more usable by enabling zoom, navigation, and safe browsing.
Now, let’s get started.
Android WebView Tutorial With An Example Project
1. Loading website in the WebView
The first thing you have to do is allow your app to access the phone’s internet connection.
To do this, add this line to your AndroidManifest.xml.
<uses-permission android:name="android.permission.INTERNET"/>
Now, add a WebView to your activity layout. Just drag and drop the WebView widget from the Palette to the designing screen of the activity.
This will automatically generate the code in the activity’s XML file, as shown in the code snippet below.
<WebView
    android:id="@+id/codeitbro_web_view"
    android:layout_width="match_parent"
    android:layout_height="match_parent">
</WebView>
Next, create a reference of the WebView in the activity class file.
mWebView = findViewById(R.id.codeitbro_web_view);
To render a webpage in WebView, call the loadUrl(“URL”) function.
mWebView.loadUrl("https://example.com/");Here is the complete code of the activity class file for your reference.
public class MainActivity extends AppCompatActivity {
WebView mWebView;
@Override
protected void onCreate(Bundle savedInstanceState) {
super.onCreate(savedInstanceState);
setContentView(R.layout.activity_main);
mWebView = findViewById(R.id.codeitbro_web_view);
mWebView.loadUrl("https://blog.codeitbro.com/");
}
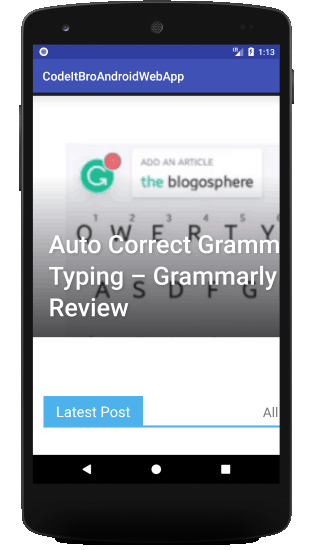
}Launch the app, which will render the specified address, as shown in the screenshot below.

But as you interact with the WebView, you will notice that it is not working as expected. No buttons on the rendered web view are clickable, and images are not fetched correctly.
It is mainly because, by default, JavaScript is disabled in the WebView. Therefore, you must enable it to make your site usable in the WebView.
You can enable it by adding these lines of code.
WebSettings webSettings = mWebView.getSettings();
webSettings.setJavaScriptEnabled(true);
Try rerunning your WebView app. You can use the website this time, and images will be loaded as in any other browser.

2. Enable zoom in web view
What if users want to zoom in or out while using your site in this Android WebView example project?
No worries, you can enable this functionality too. Add the code line below to your activity class to enable zoom controls.
webSettings.setBuiltInZoomControls(true);
Build the WebView project again and execute the app, and viola, the zoom feature is working!
3. Connecting Android App to Website
We can bind an Android app to the website using the JavaScriptInterface.
Here’s how to do it.
First, add a WebAppInterface class to your app and a variable named mContext of type Context.
public class WebAppInterface
{
 Context mContext;
}
Now, instantiate it using the constructor.
WebAppInterface(Context c)
{
   mContext = c;
}
And now, I will create a method to show a toast.
@JavascriptInterface
 public void showToast(String toast)
{
   Toast.makeText(mContext, toast, Toast.LENGTH_SHORT).show();
}
Don’t forget to add @JavascriptInterface above your method; otherwise, it will not work.
Now, add this interface to your WebView.
mWebView.addJavascriptInterface(new WebAppInterface(this),"Android");
The first parameter of the addJavascriptInterface() is the class we created, i.e., WebAppInterface. The second parameter is the name of the class used, which will call the function to display the toast message.
Now, add a button to your site using the code below.
<input type="button" value="Say hello" onClick="showAndroidToast('Hello Android!')"/>
function showAndroidToast(toast)
{
   Android.showToast(toast);
}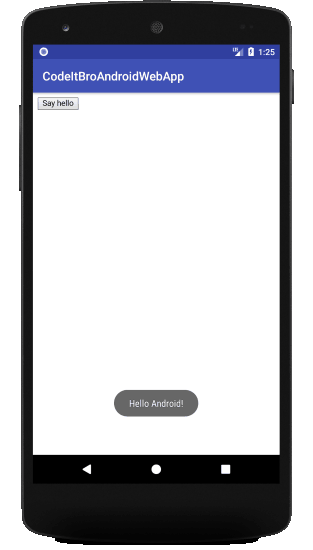
Now, rerun the app and load the webpage on which you added the button. Click on it, and a toast will appear, as shown in the screenshot above.
4. Navigating back to previous pages
Users will not like your app if they can’t visit the last pages. To enable navigation, i.e., allowing users to visit the previous web pages, use the goback() function.
mWebView.goBack();5. Enabling safe browsing
As a good Android developer, it is your job to ensure the security of your users. Fortunately, WebViews makes it easier to ensure users browse just the safe side of the internet with its Safe Browsing feature.
If you enable safe browsing, the WebView will show a warning if users try to visit any malicious URL. Use this line of code in the AndroidManifest.xml file of your Android WebView app project to enable safe browsing.
<meta-data android:name="android.webkit.WebView.EnableSafeBrowsing"
            android:value="true" />
Final Words:
We hope this tutorial will help you create a simple WebView Android app in no time. If you encounter any issues, put them in the comments, and we will be more than happy to assist you.
Download or clone our GitHub repository for this tutorial from the link below.
Download the Android WebView example project from GitHub.
About Himanshu Tyagi
At CodeItBro, I help professionals, marketers, and aspiring technologists bridge the gap between curiosity and confidence in coding and automation. With a dedication to clarity and impact, my work focuses on turning beginner hesitation into actionable results. From clear tutorials on Python and AI tools to practical insights for working with modern stacks, I publish genuine learning experiences that empower you to deploy real solutions—without getting lost in jargon. Join me as we build a smarter tech-muscle together.